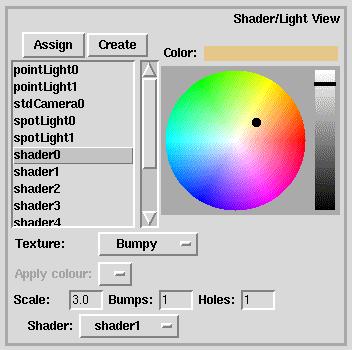
Shader/Light View
This view comprises a scrollable listbox which is populated with the Shaders,
PointLights and Spotlights in the image, together with a number of controls
to adjust the characteristics of any one of those components.
Selection
There are two ways in which a Shader, Pointlight or Spotlight may be selected:
-
by the user clicking M1 in the scrollbox. When this is done, all objects
that use the Shader, or the Pointlight or Spotlight itself will be selected
in the orthogonal views.
-
by selecting an object that uses the Shader, or the PointLight or Spotlight
itself in the orthogonal views. When this is done, the Shader, Pointlight
or Spotlight will be selected in the Shader/Light view.
This provides an easy way to find which Shader is used by a particular
object, or where a particular Shader is used. Note however, that there
are several circumstances in which there will not be an exact correspondence
between the objects selected in the Shader/Light view and those selected
in the Orthogonal views. One case is when you add to the selection
with either M3
or rubber-band selection
in the orthogonal views. The selection in the Shader/Light view will change
to the Shader, Pointlight or Spotlight that has just been selected, so
that it no longer corresponds to the previous selection. Furthermore, multiple
items may be selected which use different Shaders, in which case the Shader/Light
view selection is arbitrary - only one item may be selected at a time.
The ability to achieve a different selection plays a valuable role in changing
a Shader assignment.
Creation and Assignment
A shader can be used for multiple objects. When a Cuboid, Cylinder, Cone,
Freehand or Ellipsoid is created, a shader named "defaultShader" is automatically
created if it does not exist and used for that object. A new shader may
be created with the "Create" button in the Shader/Light view. To
assign the shader to the an object, select one or more objects in the orthogonal
views, and a shader in the Shader/Light view, and hit the "Assign" button.
Always plan to do this - the defaultShader should be regarded as a temporary
place-holder. To encourage the user, the type of the defaultShader cannot
be changed from the initial type of "Basic".
Changing the Shader Assignment
At first sight it may appear impossible to change the Shader assignment
for a certain object - if the object is selected, the old Shader will be
selected implicitly; while if the new Shader is selected, the object will
be deselected in favour of its current users. The trick here is to select
the object in question, and then select a user of the target shader by
adding to the selection with either M3
or with rubber-band selection.
This will select the target shader implicitly. Hit "assign", and the object
in question will use the new shader. If this object was the only user of
the old Shader, then it will be deleted.
Modifying Shaders, Pointlights and Spotlights
Parameters of objects edited in the Shader/Light view may be modified using
the optionmenus and entryfields. Only those fields appropriate for the
selected object will be shown and enabled. For example, the PointLight
has no such parameters, the spotlight has sharpness and shadow parameters
only, and the shader has various different parameters according to the
type of Shader.
The color wheel to the right of this view allows the color or colors
to be modified. The color wheel is derived from reference [5] Eff.
Tcl/Tk . For the PointLight, Spotlight and many Shaders, only one color
value is required. Some shaders require two colors; for example the "Wood"
shader. In this case an optionmenu is enabled to select the "color target"
- the identity of the color which will be varied with the color wheel.
When the type of a shader is changed for the first time to one requiring
more colors, then the extra colors are initialized to be the same as the
last in the list of existing colors. If however, the shader is changed
to one requiring fewer colors, then the excess colors, though temporarily
inaccessible, will reappear if the type is changed back to one requiring
those extra colors.
Bumpy Shader
The bumpy shader creates a rough texture and uses another referenced shader
to define the properties of the surface further. That shader may be any
type, including another Bumpy shader. This can be usefully exploited to
create roughness at multiple levels. When the shader texture is set to
Bumpy, an optionmenu appears in order for the referenced shader to be selected.
It contains an entry for every shader available. However, some may appear
grayed out and are disabled. This is done because selecting one of those
would create an infinite loop of shader references, which is not permitted.
Shader Limitations
The planet shader has no built in scaling factor, and is intended to work
with images scaled to a much smaller number of WORLD UNITS than is used
by the TSIPPwb, in which pixels and WORLD UNITS are equivalent.
